
For years now I have been tinkering with leather craft and, as is my way, I got to wondering at the different textures and properties of the various scraps of leather I found myself using. The variety within bovine leather by animal, breed and even position on the body is mind-blowing.
With my experiments with fish leather and deer skin I caught a fascination bug with this beautiful and useful organ that we all wear to keep our insides in.
As such I keep an eye out for bargain priced items on eBay and auction sites that I might ne inspired by. I’d never intentionally fund the exotic leather trade unless I knew the animal that grew the skin was well cared for and well used in death so that the skin was an unwanted byproduct rather than the reason for it’s demise.
I am going to preface a little here by saying that I am not an expert in restoration of skin, but I am learning. Here I will share some of my learning experience with regards to the revitalising the skin of a beast from 80+ years ago. Future blogs may talk about thing like snake skin, eel skin and ostrich skin – skins popular in ages gone by that we now call vintage.
First things first, let’s meet the bag as was and look at what it took to strip it down and get it ready to work up.

If you look at the bag in the image above you’ll notice that the folded and joined edges look tatty and on the verge of splitting and that the fake arms are missing a claw or two. Sometimes this sort of wear comes from a long period of use and sometimes it comes from the tannins used in the processing of the skin.
Anyone who has tanned fresh hides knows that there’s an important washing off step for anything using acidic tannins to tan. If excessive tannins are left on they can eventually start to deteriorate the leather, even if dry. Under inspection, this bag was suffering from both wear and tear and excessive tannins.

The first part of the disassembly process, for me, always starts with a brief moment of thanking the bag for what it was in terms of animal and item, what it has been used for and explaining what you’re planning on doing and why. In doing so you speak to it as a being with as full a story as you can know and seek cooperation from the hide. It’ll speak to you more of it’s needs and weak spots this way as you’re enabling yourself to be in mindful space when working with it.
Secondly we look at the stitches and lining. Often the stitches are well hidden and the lining is often a simple material that we may not want to keep.
If you can get access to stitches then start unpicking them with a tool designed for the job, or the sharp tip of a knife.
If you can’t then it’s time to either cut around failing clasps and find a way in that way, explore a failing crease (this can leave smaller pieces to use later though) or to slit through the liner.
In.this situation, the liner was a degraded faux leather that felt both rough and smooth at the same time. I slit through this from the inside to expose the main seams and cut around the clasp as well, setting the strap aside for later use.
In places the skin beside the seams tore, leaving the stitching behind, in others I snipped and cut them out.
The false feet were glued and stitched in place and these took gentle teasing apart. The cotton wool stuffed arms had been made using thin and now brittle strips of hide, sadly these couldn’t be saved and went in the compost a few steps later. The unbroken claws have been kept for a later project.
Once separated in to it’s constituent parts I had the lining (which was discarded), cotton wool and arm strips (that were composted) gummed up claws, a large main panel with glued on card backing, a strap, a clasp (recycled as broken) and two side panels.
The side panels felt different, at first I wasn’t sure they were crocodile skin despite both bearing the right (not matching, so less likely to be stamped) patterning. However, a little research suggest that these may be the softer, and better worked, under belly skin.
The next step was to remove grime, glue and card from all parts I was keeping. The hide and claws were layered in wet tea towels to give them a good soak and hopefully loosen up the glue (likely basic hide glue) so it could be removed.

Wet cloth rather than immersion was used to prevent the 80+ year old and dry hide from absorbing water too quick through the gaps in the card backing, meaning it was less likely to swell irregularly and then split in engorged weak spots.
After a good 12 hours of soaking the parts were all rubbed clean under running water to remove as much grime and glue as possible. The card was rubbed off the main panel to expose a roughly tanned surface underneath. The connective tissue of the claws had turned to glòopy gelatine and so gave a visceral experience when washing off.
The tea colour of the rinsed off water and the feeling of my tannin rough fingers afterwards was enough to show me that the main panel was still full of unbound tannins that should have been washed off when the hide was originally preserved many decades ago.
Once all parts were rinsed they were left to drip dry in a cool and airy place until fully dry. This took several days but the final result was far less waxy and grimy feeling than it had been.
At this point it is important to check over for newly appeared tears and splits – a couple of the edges had split in this case and this means that the skin wouldn’t be up for much stretching once oiled up, as well as highlighting the areas that need trimming or reinforcing in order to make usable.
Once the hide was cleaned and dried it was time to consider the next steps – I could have used it as it was, but it would be likely to split further and be less resilient to tearing when simply putting a needle through it.

I decided to give it a heavy coat of olive oil to see how thirsty it was and to bring out the natural sheen of the scales. I could’ve used a melted hard fat like tallow or lard, but I find these tend to leave more residue and go a little fry up smelly on sunny days when compared to olive oil or hemp oil. Olive oil can go a little waxy on the surface in cols weather mind, so it’s not perfect, but is definitely serviceable.
Leaving it overnight again I could then give an extra coat of oil to the few spots that turned out to have not drank their fill.
The skin took in a lot more of the oil than I anticipated and some of the thinner areas were a bit more saturated than I’d like. Here, with flat skins (unlike crocodile) it’s possible to lay them between two cotton rags/towels and weigh them down with an old heavy book or several wooden boards to press the excess oil out in to the cloths. Generally, I advise applying several lighter coats of oil.
In this case the skin was to be made in to a case for wooden items that wouldn’t suffer from a little oil coming off the interior of the case.
When the summer sun is hot I might tightly wrap the case in an old black cloth and leave it out in the heat to draw any excess oil out if it proves to be a problem.

But, why oil in the first place?
Oil is added to do several things: improve suppleness, add shine, waterproof and to slip between the connective fibres of skin preventing them from snagging up together plus to reduce oxidation decay over time and slow down the action of tannin residues.
After a good wipe down to remove oil still on the surface I might usually stretch any rigid spots out to add in flexibility, but in this case the skin would be more suited to the desired use if a bit stiff, and, I didn’t want to cause any further weakening of already split edges.
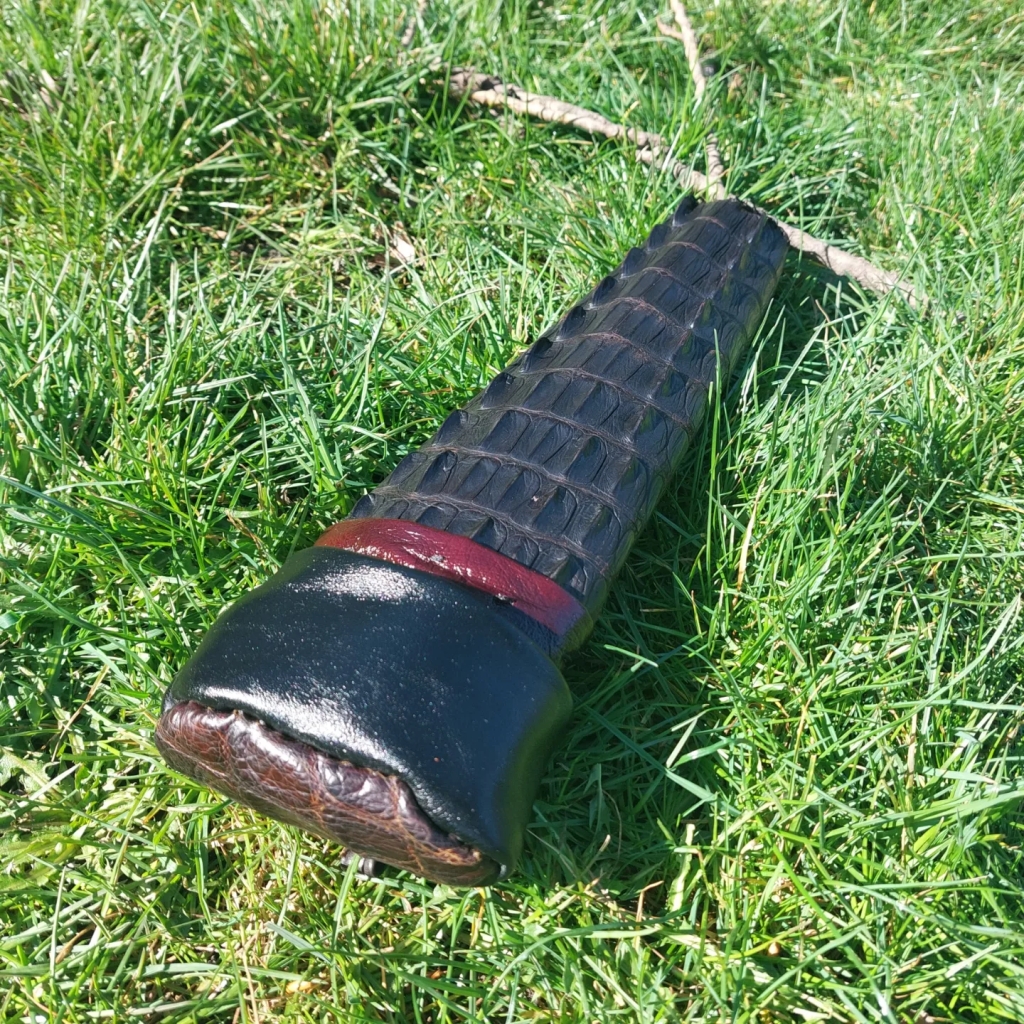
At this stage, the Crocodile skin had come up in to a beautiful dark chocolate brown and was ready to use.
For my particular project I had enough material to create a tapering sleeve of crocodile skin from the larger piece and, from the side panels, enough to make the base and top of the cap. The strap would go on to become a cap lanyard and belt, I would add in a collar or two of scrap bovine leather to finish it off.
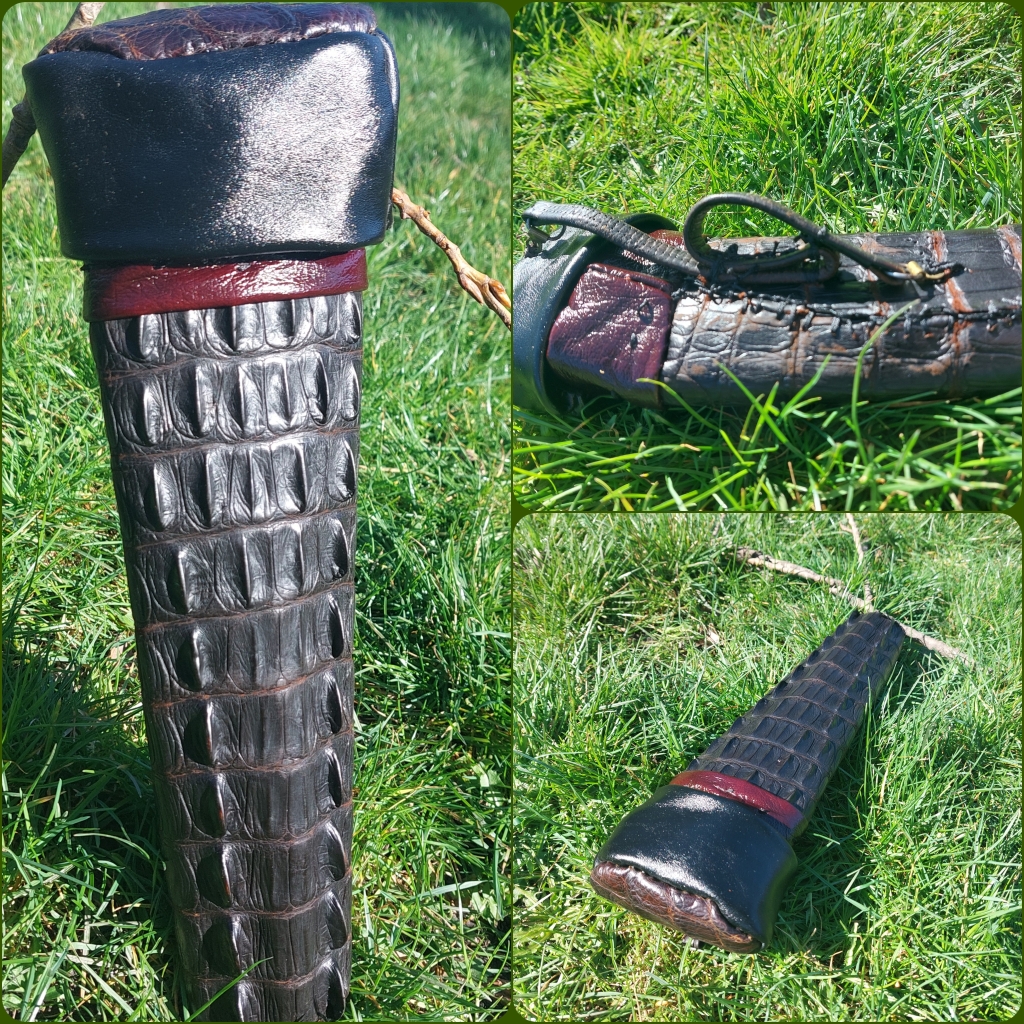
With the shape required and with the skin being so rigid I could not simply sew and then turn the case inside out so as to hide the seams as I would with thinner cow leather. As such the stitching would need to be done on the outside using awl, curved needles and messy knots…. but I think it turned out OK and should see many more years of use.
At the time of writing I have some snakeskin beingn rejuvenated… so if I learn any more I’ll post again.
Let me know if you’ve done similar projects and if your technique varied from mine.
To keep up to date with all my tinkerings follow me on Instagram


