This blog aims to give you gentle encouragement to try your hand at tanning your own fish leather and to guide you through the basic steps.
I’ve been on a learning curve for a few months as far as fish leather is concerned and I want to share a few lessons I’ve learned.
For many of us, our Ancestors would’ve rejoiced when the salmon and eel migrations filled the nets annually, or, when the shallows were filled with schooling fish coming in to warmer waters to spawn. Furthermore whole cultures emerged based around or supported by rivers, seas and estuaries. Fish would’ve provided, and still do, much needed nutrition and oils to keep populations running well.
Yet, fish doesn’t keep well once it’s dead and so in hot regions it was dried while, in many temperate areas it would’ve been cut and smoked and salted and dried to preserve it. In cases of thick skinned fish the speed at preservation waa achieved would be aided if the skin was removed.
This meant, for populations relying on seasonally migratory fish, like salmon, that there would be a sudden glut of shimmering fish skins. Left around they attract flies and scavengers, let alone smelling unpleasant rather quickly. Part of the human condition is to be both opportunistic and resourceful… so it’s likely that those ancient people would’ve made good use of the skins; tanning them, oiling them and using them to make bags, clothes and covers.
With silver brown shining outfits, rather than drab brown and grey as often portrayed, one can see them looking like glam rock spacemen with flint knives! Doubtless it was very confusing to megafauna to have predators dressed like disco goers of the 1970s.

Most of us rarely have the opportunity to drown in fish these days, what with the industrialisation of our waterways ending many migratory routes prematurely.
But… it’s possible to make the most of the occasional flurry of fish that might come our way. Skin is an organ, so it’s good to eat nutritionally speaking, but there’s also good reason to try your hand at tanning.
This blog will focus on the basic techniques used in vegetable tanning fish leather. I’d link to the instructional pdf that got me started…. but it seems to not be online anymore. So you’ll have to make so with my writing and your own research.
How to get tanning:
Step 1 – buy your fish and decide on your plant based tannin source. Try to buy or catch fish according to your own ethics, or ask your local fishmonger for the otherwise waste skins of fish like salmon, tilapia or any other species you want to experiment with. Often these skins will be given to you freely … otherwise skin your fish. I find that fingers working under the skin will help it come off in one piece better than using a knife alone.
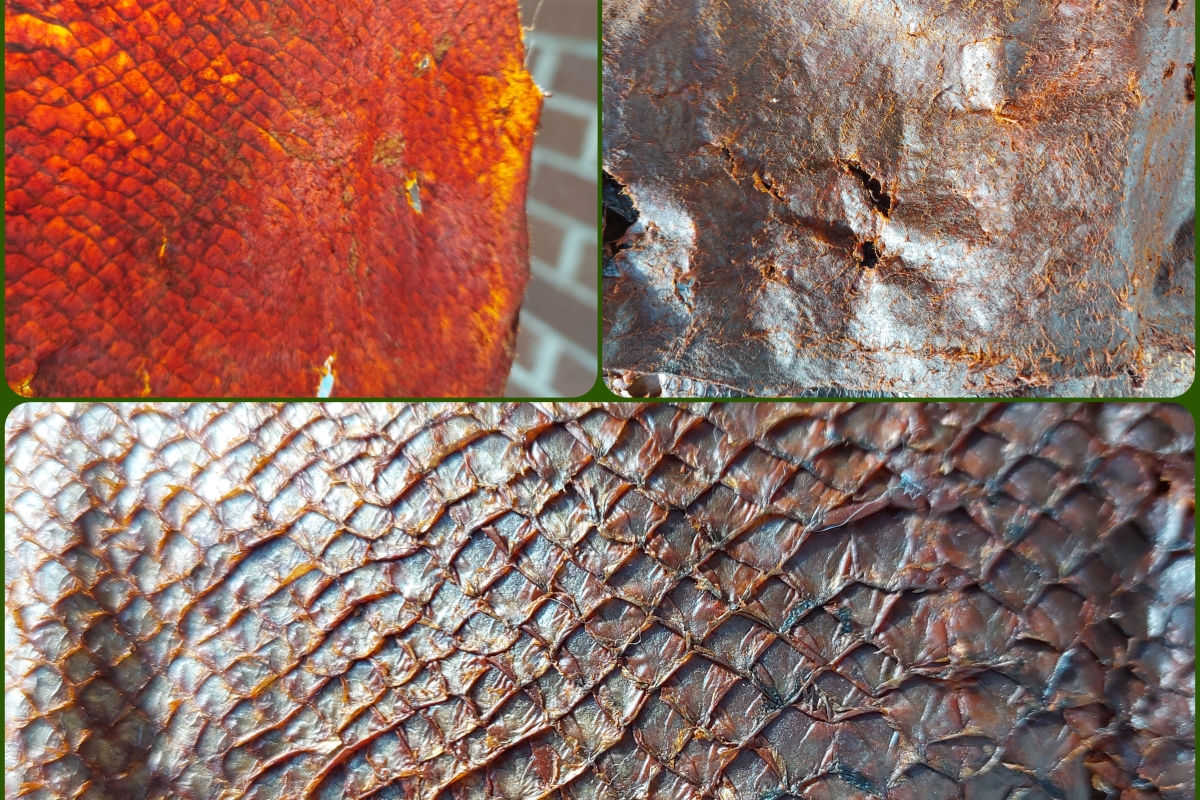
Step 2 – Once your skin is free from the fish you’ll need to carefully trim off any fins before placing it scale side up on a board. You’ll take a dull knife (too sharp will cut the skin) and scrape any scales off the skin. If these are left on they can impede the tannin absorption by the skin beneath.
Step 3 – flip your skin over so the flesh side is facing up. Using your knife work slowly and meticulously to remove any fat, flesh or fibres/connective tissue from the skin. Make sure you get the edges cleaned and don’t press down so hard that you tear the skin. Some skins are thicker than others and will take a rougher hand to get it scraped clean.

Step 4 – wash your skin off in slightly soapy cold to like warm water. Too hot will damage the skin. Work the skin in the water for a few minutes each to remove any fats or scales still on the surface. Rinse off each skin in clean water and set aside.
Step 5 – make a cuppa. While you’re at it pour the rest of the water over around 8 – 12 teabags to a litre in a large jug or jar. Tea (Camellia sinensis) is ideal for use in the learning process and it’s easy to move on to willow or Oak bark as a tanning solution after that.
The tea needs to steep until cool and dark. Using too strong a tea will potentially burn the surface of the skin and prevent full absorption throughout the thickness of the skin. 12 bags, or around 15 teaspoons of looseleaf tea per litre seems to work well as a starting brew.
Step 6 – remove your tea bags from the now cold tea and pour it in to a container that you’re going to use to house the tanning skin for the next ten days or so. I use a 1 or 2 litre Mason jar without a rubber seal.
Submerge your skins in the tea. A litre jar will do around 4 to 6 side skins from salmon… but it’s important that it can all be submerged easily without squashing together top much. Equally important is that all surfaces of the skin are exposed to the solution and that there are no folds stuck together. Stuck together folds will rot rather than tan.

Step 7 – change the tanning solution every other day with slightly weaker cold tea 7 – 9 bags per litre works well. Remove each skin every time and check for, and amend, any folded spots, before submerging them again.
Step 8 – after around 10 days it’s time to test the skin to make sure the tannins have worked all the way through the middle fibres. Trim an edge off and check the colour – it should be brown all the way through. If there’s still white in the centre layers then you need to tan for longer… or your original solution might have been too strong as referenced above.
You should notice that the skin now feels different – stiffer and more like thin leather. It should also smell like earthy tea rather than have a fish or ammonia aroma.
Sometimes a skin just doesn’t want to tan despite the others in the same solution coming out fine. It’s good to fail sometimes – it enables learning.
Step 9 – wash excess tannins out of your skins with cold water before leaving to drip dry. Your environment here is a big variable and you’ll need to keep a close eye on your skins to ensure they don’t dry out too fast.
As soon as they feel slightly tacky, rather than wet, to the touch it’s time to think about the next step.
Step 10 – apply a thin coat of oil or fat to both sides of the skin making sure to cover it all.
I like to use olive oil, hemp oil or tallow. Any workable fat will do (but butter isn’t ideal) and if you’re so inclined adding a tiny drop of dish soap and stirring it in to the fat before application will emulsify the fat helping it work in to the spaces between fibres of stiffer skins, but it’s not really necessary.
Start stretching the skin gently inch by inch and in all directions, pay particular attention to stiff spots.

You may want to add further coats of fat as you go along. The stretching works the fibres in the skin apart and allows the oil to get in amongst the fibres helping to preserve the skin further and stop the fibres from drying bound up.
Keep working the skins for a few minutes here and there in cooler areas or until fully dry in hotter weather. The more you stretch the skin the closer to supple it’ll become.
Some skins come out like fibrous flexible leather, like tilapia. Some come out more like a stiff cloth such as salmon. Some, such as hake and haddock, come out like flexible plastic sheeting.

Experiment with what’s available to you and learn!!
Step 11 – apply a final coat of fat and work it in well before wiping off any excess with a dry cloth.
Now use and honour the fish in the using of and telling of stories of your crafting.
Finally, let me know if you do differently and why. Just give it a try.
To keep up to date with all my tinkerings follow me on Instagram